As teachers, our time is extremely precious in a way that “civilians” just don’t understand. Because of that, an unproductive meeting is really, really awful.
Using protocols makes it much more likely that meetings will be productive. So we use them a lot.
These norms are the oil that makes the machinery of the protocol run smoothly.
If you tend to talk a lot,make sure you don’t dominate the conversation, and that everyone has the opportunity to speak. Equally, if you tend not to speak very much, make sure that you are contributing – otherwise nobody will get the benefit of your insights.
Make sure that discussion (especially criticism) is focused on the project, not the person. this distinction needs to be crystal-clear in order to maintain a culture that is both rigorous and collegial.
Thanks to Amy Raymond, who brought this protocol to High Tech High Chula Vista
| Goal: to help a teacher quickly brainstorm lots of ideas for a project |
One presenter (or more, if the project is a collaboration), one facilitator, one scribe, and 3–10 others.
If possible, include students as well as staff in the group. Students tend to make the best suggestions.
Make a grid on a whiteboard, a big sheet of paper, or document on the projector.
Here’s what goes on the grid:
Project Title:____________________
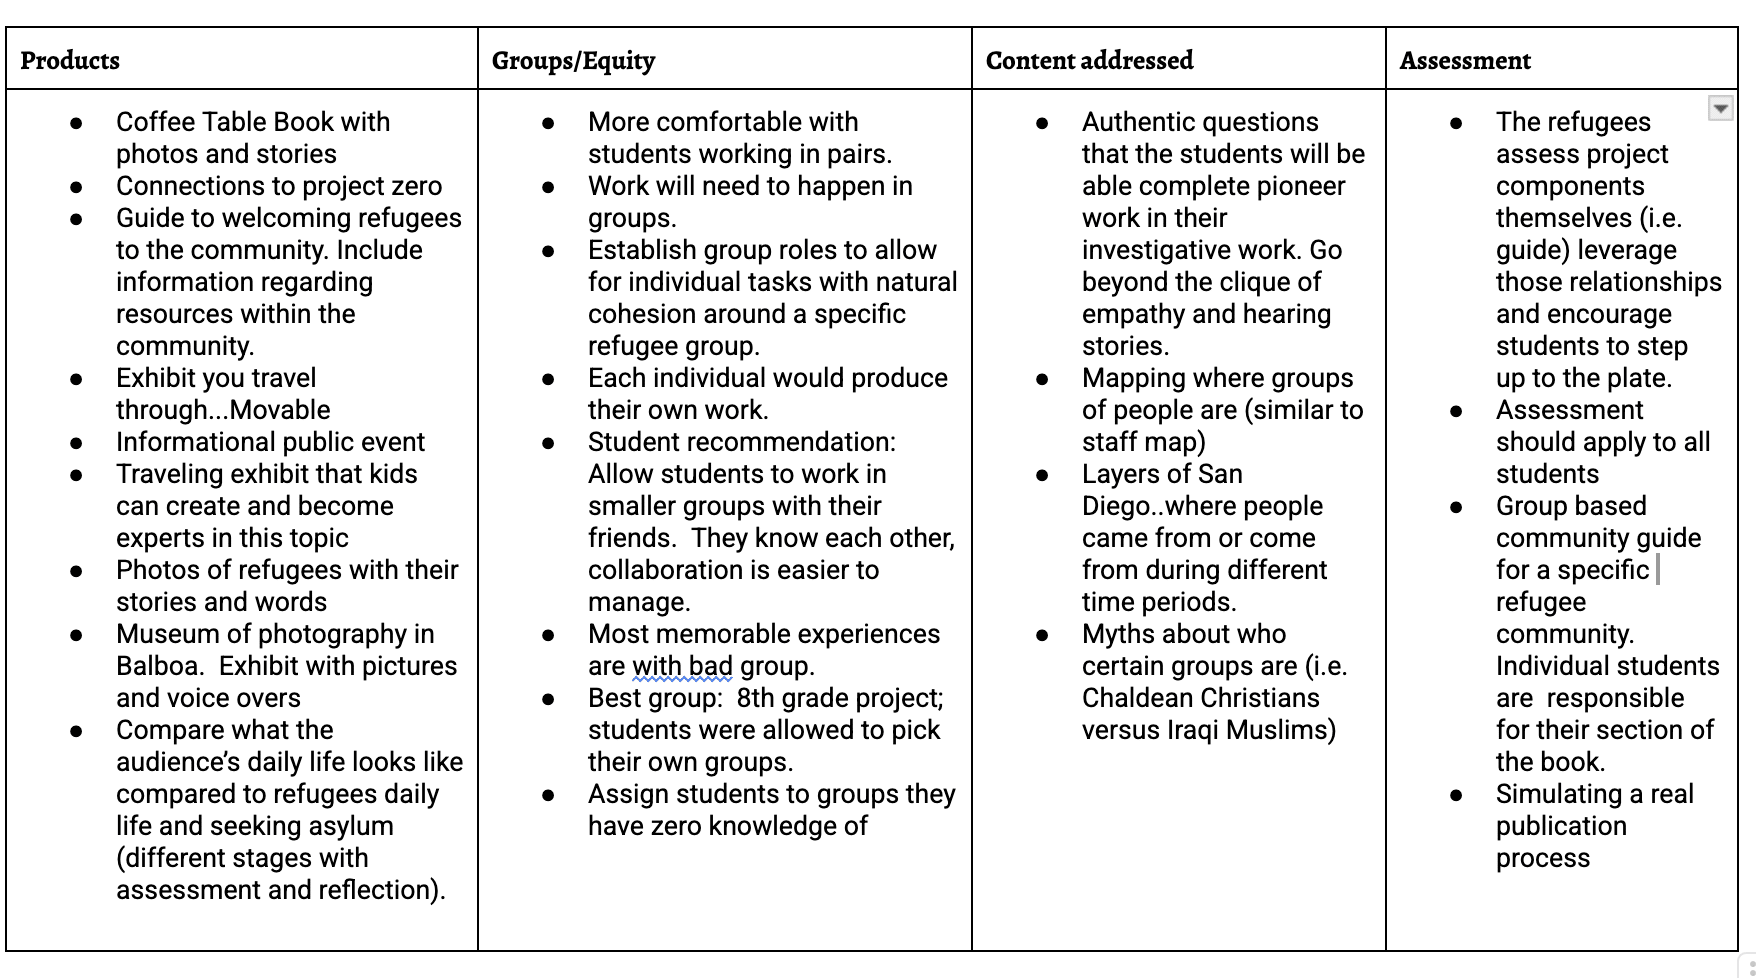
| Products | Groups/Equity | Adult-world Connection | Content Covered | Assessment | Literacy | Skills |
|
|
Note: You can change, add, or drop headings to suit your project. Other possible headings include “Engaging/Inspiring Students”, “Scaffolding for Quality”, “Integrating Hands-On & Minds-On Learning”, “Access & Challenge.”
Presenter gives a brief ( really general) overview of the work and explains what goals he/she has in mind for the project while the scribe takes notes. The presenter might choose to also put the project into context so the group understands how it fits into the larger scope and sequence of the class. Participants then have an opportunity to look at any “work” (e.g. project handouts, models of the kind of products they might make, etc.). The presenter then shares where there are still gaps in their thought process and what section they need the most help with.
These are used to get a clearer understanding of the project. They have short, factual answers.
Examples: ‘How long will the project last?’ ‘How many hours per week will students have to work on it?’ ‘Where will the work be exhibited?’ ‘Who are you planning to invite to the exhibition?’
For each column the goal is to make an extensive list of possibilities that build on the presenters original idea. At the beginning of each section the presenter throws out their thoughts so far on the topic as it relates to their project and then participants jump in and build off of them.
The facilitator leads a conversation about the group’s observation of the process. One mark of a good facilitator is his or her ability to lead a good debrief. Questions posed to the group might include: Did this process expand our thinking about our project? Were our ideas big and creative? When was a moment when the conversations made a turn for the better? Was there any point where we went off track? (5 min)
This project became the Syrian Refugee Simulation – you can learn all about it here